Archive for May, 2008

Guitar 0408 – The Koa’s on backorder

May 21, 2008

I’ve place an order with LMI for a Koa back and sides, Mahogany top parlor guitar.  The Koa is the best quality figure and color available, but it’s on backorder until May 30th.  So, I don’t expect any deliveries until early June.

I’ve dropped a line to Iris, the person for whom I’m building the guitar.  Here’s the gist of my email:

Now that this looks official, I want to let you know that I am very excited about building your guitar.  I have made some design decisions which, if they come out like I imagine them, should be stunning.  My only concern is that I become quite attached to the guitars that I build, and once it’s ready for delivery, I may get a little emotional.  

I will keep you posted all through the build process.  I will document on my blog, and whenever I post an update on your guitar, I’ll send you an email prompting you to go take a look.  Also, if you are interested, I can run design decisions through you for your input.  Of course, you can always choose to allow me to take off and make all decisions myself. 

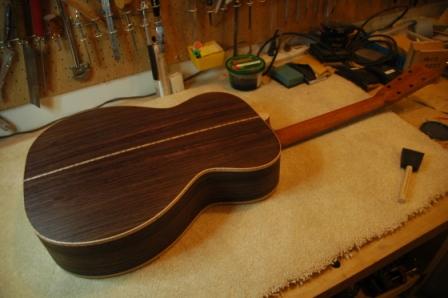
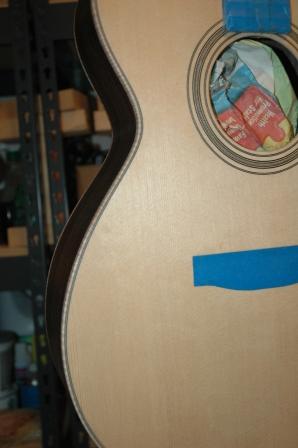
I work on several guitars at the same time.  For example, I’m finishing up a Rosewood OM guitar for myself at the same time I’m progressing with Larry’s Maple OM.  Once your materials arrive (by May 30th), I will be finished with the Rosewood and be working on Larry’s and your guitar at the same time.


I don’t know how quickly I will deliver, but it looks like around 3 months, on average, from start to finish

Guitar 0208 – Grain pore filling

May 20, 2008

I think I’ve got it down. My second attempt at filling the grain pores came out quite nice. I applied less, scraped more, and worked smaller sections. I must have thought this through in my head for most of the day and was able to carry the ideas into the shop as the application went very nicely, with a dry surface that will require little scuff sanding before i start the repeated lacquer coats.

Even though this is the second application, the pores don’t seem to be fully filled. Do I do it again, or is it acceptable? Will the lacquer coats eventually smooth out without leaving any pore indentations?

aftergrainfill.jpg

topsealed.jpg

Guitar 0308 – Rosette repair and Fretboard binding

May 20, 2008

Decided to rout out a wee bit of the lacewood up to where it meets the BWB, or more accurately, where it didn’t meet the BWB. Used a 1/32″ downward spiral bit and went around twice, adjusting the diameter a skosh to open a channel to accept a two-ply maple binding strip. Aside from the fact that I almost cut through the top, and I broke off the spiral cut bit, I glued in the maple, trimmed it down, and the the end result is visually much nicer than the ragged gaps from the original lacewood BWB inlay.

rosettefixed.jpg

I cut down the unradiussed maple fretboard to the dimensions in the plans, planed the sides smooth, then relieved a small amount on each side on the band saw to allow for the attachment of rosewood binding. After planing the resawn fretboard and dry fitting the rosewood binding to the fretboard, the final dimensions were a wee bit under the plan dimensions of 43mm at the nut and 59mm at the soundhole end of the fretboard. I always seem to miss the mark on dimensioning either on the too small side (there’s no going back on this one) or way too proud (which requires massive sanding to bring down to size). Ideally, in the future, all my cuts will result a wee bit proud, requiring minimal sanding to arrive at the final dimension. I think this is like practicing a lick over and over again until you have it nailed.

fretboard.jpg

Guitar 0208 – Finishing

May 19, 2008

I’ve embarked on an alternative finishing approach for my second guitar.  First guitar, I used a spray on nitrocellulose lacquer which forced me outside and reeked of banana souffle.  I was introduced to a brush on lacquer (water based) called KT9, which I got from LMI. 

I sanded the guitar in preparation for finishing and applied a sanding sealer coat of KT9 diluted to 50%.  Amazingly, this stuff has NO odor.  The sealer coat went on marvelously, and I only created a few unsightly dribbles across the waist.  Before sealing, I applied a 5 part tobacco to 1 part red stain to the mahogany neck.  As careful as I was to mask, I bled through slightly onto the maple veneer on the headstock.

The next step after sanding sealer is the grain pore filler.  I botched it terribly.  It’s hard to work with, leaves streaks on the surface, and I over did it on application.  I slept poorly last night obsessing on what I did wrong.  Books suggest the pore sealer usually takes two coats, and I think I know what to do to improve this process for the second coat.  I will apply in stages, back, sides, top, neck, with significant wait time between each stage, and apply very thin amounts, carefully scraping off all surfaces before it dries to leave only sealed pores, allowing light sanding to get back to the wood surface.  As it is, I have left myself a monster sanding job to get the grain sealer off the surface of the wood.

Even though I practiced on scrap, it doesn’t give you the pacing practice for larger surfaces, which only comes with applying to the real thing. 

Guitar 0208 – Nut

May 17, 2008

Today I will finish trimming up the frets, filing down the fret ends flush with the fretboard, and bevelling the fret ends.  Even though the neck is pretty straight and most of the frets are straight along the neck length, I will do a tiny bit of fret levelling with a mill file.

Once that is complete, I will begin the finish process:  clean, clean, clean, sand, scrape, sand, sand, sand, clean.

The topic “nut” refers to the bone nut between the headstock and the end of the fretboard.  I’m using a preshaped bone nut which has a bevel on the bottom whereas my channel is flat.  I inserted and glued a small piece of mahogany to bring the channel up flush with the nut.

fretson6.jpg

Guitar 0308 – Rosette

May 17, 2008

First opportunity to install my own rosette.  Larry and I decided on using a lacewood ring as the centerpiece of the rosette for his OM Maple.  Carefully reviewed all DVD and book instructions and discussion about coating top with shellac to reduce tearout also claimed using a good spiral cut bit would preclude having to shellac.

As I have a lot of sanding to do to get the shellac off the Rosewood OM spruce top, I decided to forego the shellac and rout the channels raw.  I channelled the center slot for the lacewood first, glued and inlaid it in anticipation of routing the outer and inned channels flush against the lacewood for the BWB.

rosetteprep.jpg

Clever, I thought, but I routed the inner channel slightly proud of the lacewood leaving a minute bit of spruce between the lacewood and the BWB.  I won’t know if this is visually yucky until I scrape down, sand, and finish.

rosetteprep3.jpg

Was very careful not to rout too deep as that error can result in going through the top.  The converse though creates a lot of work scraping and sanding down the purfling flush with the top.

rosetteinlaid.jpg

The end result looks good, but we’ll see.  Next, scrape, sand, then cut out soundhole.

Guitar 0308 – Headstock shape

May 15, 2008

I have engaged Larry in several design discussions.  One was on the end block trim, and we decided to craft a rosewood/maple/rosewood end trim to complement the rosewood binding.  Another opportunity is to come up with a groovy headstock shape.  I think this can add a bit of distinction to his guitar without getting too crazy.

My comments to Larry:  Tradition calls for the Martin style, like on my current OM, but you have a choice. When I insert the rosewood center trim, the width of the neck blank will be enough to allow us a large lattitude of shapes. Example would be your Taylor headstock shape, or a Gibson, or the ever goofy Hamer (goes to a point at the top and the tuners land exactly along the string line for all strings), or 6 on the right like Fender (we would have to buy different tuners). When we get together to pick colors, we can sketch headstocks. If for some reason you were interested in the Taylor shape, bring your guitar so we can make a trace.


Guitar 0408 – The birth

May 14, 2008

Larry has been in communication with Iris, my new client, about the options for her guitar: body style, tonewoods, rosette, purfling, etc. It looks like we’re going to pursue a Parlor size with Mahogany top and Koa back/sides. This should be a stunning little guitar and I’m excited about working with Koa. I think a herringbone purfling will look nice, and I was inspired by a little Martin type 5 that I saw at Elderly to use as a model. The Martin has a spruce top and rosewood back/sides, but the appointments look nice and I’m going to try and model some of these after it.

Here’s an example of the purfling.

528le_front-detail.jpg

Continue Reading »

New numbering

May 14, 2008

Things are getting serious.  I’ve made a decision to restructure my guitar numbering scheme.  I started out simply numbering sequentially from 1.  I’m on a pace for about 5 or 6 guitars a year, and I began to consider that the guitar number should be informational.  So, I’ve changed from 001 to 0108, where 01 is the sequential number, 08 is the year it was built (started, finished?).  So you’ll see the log categories have changed and the titles of my posts will also use the new numbering schema. 


Guitar 0308 – In the mold, end/neck block glued in

May 12, 2008

I was able to use my new Robo Sander to clean up the OM mold I built.  I noted there were some “not square” conditions on the mold sides which manifested into my first OM a bit out of square from bout to bout.  The Robo Sander is like a giant router flush bit.  Assembled the newly square mold and put in the maple sides and had a very hard time getting all surfaces flush against the mold.  I think it’s a result of the LMI bending not being quite tight enough around the waist section.  I had to craft an additional spreader to get the sides up against the mold all the way around.  This will be an issue when I glue on the top and back as it will probably put a lot of strain on the glue line for the top and back to keep the sides aligned.  If I continue to use LMI for side bending, I may want to invest in a bending iron to fine tune the bends so the sides sit in the mold almost perfectly, thus not requiring godzilla spreaders to force the shape.  I also think my lag bolts holding the mold sides together are ready to give.  I can hear them scream.  Next time I release the mold, I’ll ream out some channels to use a nut/bolt to secure the mold sides before the lag bolts give way.

larry-mold.jpg

« Prev - Next »