Archive for July, 2008

Guitar 0308 – Plan of attack

July 9, 2008

  1. Build jig for slotting neck for install of graphite rods
  2. Trim headstock veneer
  3. Build routing jig for neck tenon and body mortise
  4. Build bench end guitar body vise
  5. Sharpen/burnish scraper
  6. scrape sides, fair and square
  7. install binding
  8. Route neck / body after determining neck angle

Guitar 0408 – Plan of attack

July 9, 2008

OK, rather than run down into the shop and start working on whatever I bump into, I’m compiling a list, by guitar of what to tackle next.

  1. Bend the side waist tighter using bending iron
  2. Cut sides
  3. Glue in butt block after checking square, dimensions, and radius
  4. Glue in neck block after checking dimensions and recording distance between holes in mortise
  5. Trim down the spreaders
  6. Make a rosette jig
  7. Cut the rosette channels, use teflon strips, remove, install abalone, flood with super glue.  Don’t forget the vinyl sealer

Guitar 0308 – Headstock veneer installed

July 8, 2008

I prematurely glued down the headstock veneer on the maple neck. I say prematurely as I purchased graphite rods to set into the neck, and the presence of the headstock veneer will make the channel routing all that more difficult.

dsc_1006.jpg

Maple necks are notoriously heavy and prone to movement or warping. The introduction of graphite rods (2, either side of the truss rod) will reduce the neck weight and give it stability to prevent future movement of the neck.

dsc_1007.jpg

I’ll need to build a jig for sawing the slots before heading out to Vashon to use Carl’s table saw. Even with that, I will run short of the desired length of the slots, as I’ll run up against the headstock veneer. I’ll probably need to finish off the channels with my Dremel, which for a short distance, will work well.

My next challenge is routing out the tenon channel in the body and creating a matching tenon on the neck with the proper neck angle. O’Brien has a nice jig example, and I can apply the knowledge of setting neck angle from my ASL workshop.

Guitar 0208 – Finish implies finish

July 8, 2008

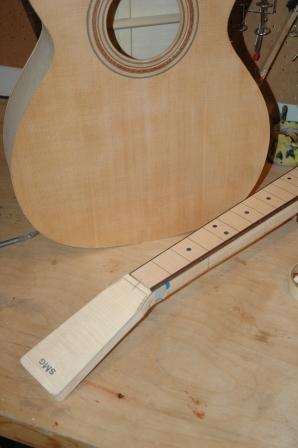
Getting this guitar finished (completed) is drawing out longer and longer. Because I used a brush on water based finish, I have a surface texture full of brush lines. I don’t think it’s because of my technique, but rather the inherent issues with brushing, regardless of the claims of the product to dry smooth. I may continue using the water based lacquer, but only if I spray. I also will finish the body and the neck separately, as doing so joined, I have created a zone of undesirability in the areas where the fretboard meets the top, and the neck meets the body.

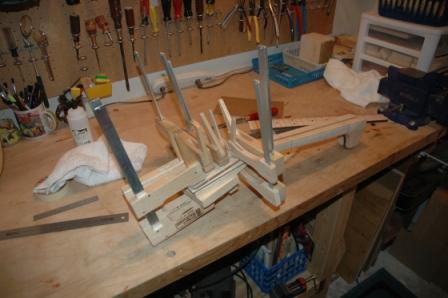
I built an adjustable workboard to hold the guitar to the workbench. This will allow me to work vigorously on the top, back, and neck as I continue to sand out the brush lines, then progressively work through finer sandpaper to arrive back at a gloss finish. I dread working the sides, as they contain the most brush lines, and I don’t yet have a proper method to secure the guitar to the workbench to address the side sanding and buffing. I’ll either work on my lap, or build a vise like the one shown here.

dsc_0866.jpg

I still have the issue of the chip out on the headstock to resolve, but haven’t come to a good conclusion.

Here’s where I resist my desire to cut corners or give up. I need to work in phases, making small accomplishments in the finishing process, and get to the point where I can move on to the mounting of the bridge and the string setup. I’m so close.

Guitar 0408 – Refining the mold, thinking about spreaders

July 8, 2008

With all the care and concern over getting the Parlor mold to be square and fit together such that each side mirrors the other, I still assembled a skosh off kilter.  I am using 3/8″ bolts to hold together, through 3/8″ holes.  As the left side was a bit north of the right side, I widened the holes in one side, reassembled, and got both to match perfectly before drilling a key hole in each end to accept a dowel.  Now they match, and opening and closing the mold should bring it back to it’s original orientation using the key dowels as a register.

The prebent sides fit nicely, but there is still a slight gap between the waist and the outer dimension of the bouts which I can resolve through a compression clamp, or a tighter bend in the waist.  I think I’ll try the tighter bend using my newly acquired bending iron.

I prepared the heel block (or butt block) and realize my neck blank does not contain the dimension needed for the neck block.  I’ll have to get my hands on a piece of mahogany which is appropriate.  I also trimmed down the width of the spreader blocks, for fear I wouldn’t be able to release them from inside the Parlor body as the soundhole is smaller than my last guitars models.

I’ve scheduled an appointment with Carl and his table saw to use for squaring off the neck block in preparation for shaping the neck. 

« Prev