Archive for June, 2008

Guitar 0408 – Making the Mold

June 29, 2008

Used the free MDF from Dunn to build a mold for the Parlor.  I spent some time at the drafting board (really the ping pong table) and first made the posterboard half plate using the plans as a guide.  Then transferred to plexiglass to make a permanent half plate.  Used the plexiglass to trace on the MDF to start building the mold.

dsc_1004.jpg

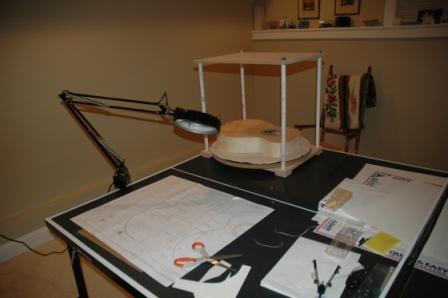
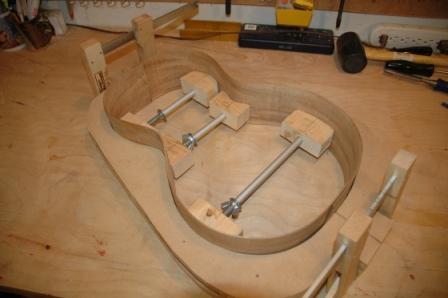
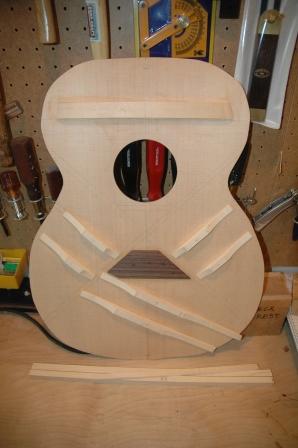
I ended up making the mold three ply, with the center section kind of a set of spacers rather than full sheet.  Was very careful to make square and to line up perfectly when adding the bolts.  Still, it’s a skosh off kilter, maybe by 1 mm.  I think that’s within my tolerances.  It looks right, and I put the sides in and the spreaders, and it will sit a bit before I get back to trimming the sides and gluing in the neck and butt block.

dsc_1005.jpg

Guitar 0408 – Building a mold

June 29, 2008

Now that the OM is out of it’s mold, and I have use of the spreaders, I’ll spend today building a mold for the Parlor so I can get the sides in and settled.

I’ll begin by making a posterboard half plate from the Plans, then transfer to plexiglass.  Once I have a plexiglass half plate I can trace out a master on MDF, cut in the band saw, then drum sand down to the exact shape.  I think I’ll go with 3 layers of 3/4″ thickness for the mold, but I might fool around with an open frame of two dowelled together.

Guitar 0308 – Back and Sides

June 28, 2008

Finished gluing on the back and sides on the Maple OM.  I also, before assembling top, routed out the truss rod channel and drilled the neck bolt holes in the neck block.  Looks good.  Next step fairing and truing the sides before I move on to binding.

Applied first set of practical knowledge from workshop by creating a posterboard template, then a plexiglass template for the headstock.  This will allow me to center my MOP on the headstock plate when gluing the veneer, and accurately locate the tuning machine holes.

Back Home

June 27, 2008

Whew.  Back from my contemporary guitar making class.  5 solid days of intense information sharing.  I’ve posted my notes and photos on the ASL page of this blog, which is password protected.

Guitar 0308 – Back attached, top bracing in progress

June 21, 2008

Cut down fiberglass rod stock (1/4″) to 18″ lengths to use in go bar clamping deck for attaching back and top.  Worked verrrrrry carefully to notch out kerfing on back to accept bracing.  Intentionally routed out less depth than needed, then checked and used a mini-rasp to deepen each notch as needed.  Also used glue verrrrry sparingly on kerfing.  The new rods for the go bar gave plenty of pressure, the small amount of glue held and I had no squeeze out to clean up after.

080621inside.jpg

080621backend.jpg

Returned to working on the top bracing.  Trimmed back the side bracing fingers to accept the X braces snugly between the bridge plate and the side braces.  Trimmed down the side braces, bringing them to a point.  Notched the flat brace at the top to leave room for the truss rod adjust and glued in the mid cross brace just above the soundhole.  This brace was drilled prior to gluing for allen wrench access to the truss rod.

080621topbrace.jpg

Preparing for ASL

June 21, 2008

Tomorrow I head off to Portland for a 5 day course called Contemporary Guitar Making.  The course is offered by the American School of Lutherie, aka, Charles Fox.  The description:  CONTEMPORARY GUITAR MAKING is a window on guitar making’s dynamic new reality. Today’s high quality guitar making is based on an accurate grasp of the acoustical behavior of the instrument and a working knowledge of the most effective means of the craft. Armed with these two things, a growing number of world class luthiers are able to systematically optimize important qualities of their guitars, and to build enough of them to both advance steadily in their craft and make a comfortable living. CONTEMPORARY GUITAR MAKING invites you to share the understanding and the techniques that make this possible.

Hmmm, world class….comfortable living….

I’m looking forward to the exposure of information and techniques, being essentially self taught to this point.  Tomorrow I pack up, and I’ll leave just after lunch to get to Portland in time to hang with my step-sister, Shannon, and her family.

Gotta pack my laptop (so I can post daily progress reports), my new Kindle (birthday present from Carol), camera (to document through photos), cell phone (to keep contact with outside world).  Funny, I’m off to learn about the world of wood and craft, yet I’m taking nothing but technology. 

Guitar 0308 – Top bracing

June 18, 2008

I’m applying the top braces in the order recommended in Cumpiano.  First bridge plate, then uppermost thin brace then side braces.  X brace will be last after side braces are shaped and sanded.  I shaped the tapers of the braces on the bandsaw in pairs to give exact matches of tapers on like braces.  I used a french curve to pencil in the tapers for a clean swoop.

Next, I’ll use the finger plane to crown the side braces before installing the X brace.

080616topbrace.jpg

080616topbrace1.jpg

Guitar 0208 – Final coats of lacquer

June 18, 2008

9 coats of lacquer throughout.   It’s really looking good.  Before I run off to the workshop next week, I’ll 440 sand and then decide if I need to do 3 more coats or proceed with the progressive finer sanding then buffing.

Guitar 0208 – The longer I wait, the less I know

June 15, 2008

I’ve been reluctantly finishing my second guitar. Not that I don’t want to get the strings on and see how it sounds, but I’m doing my first brush on finish using KTM-9. The good thing, no odor, the bad thing, I’m not applying it well. So, my theory is that if I ignore it, it will heal. Well, it hasn’t healed. But, I did put a lot of time today toward sanding out the imperfections.

I found myself thinking I needed to abandon the brush technique halfway through, and invest in spray guns, compressors, and spray booths. I convinced myself to wait for the investment until after I’ve taken my class next week. I could learn something that sets me on an alternate path.

The results of my sanding session today were so good, I decided to continue with the brush method. So, three more coats before I once again decide to change direction, or stay the path.

0806157coats.jpg

080615finish2.jpg

080615finish.jpg

Guitar 0308 – Started the carve

June 14, 2008

Spent some experimental time working on the maple neck. I say experimental as these are my first forays into neck carving. I routed the truss rod channel, trimmed down to the approximate size with the band saw and began trying the different shaping tools I have: Japanese rasp, spoke shave, regular rasp, and chisel.

080614head.jpg

080614neck.jpg

The rosewood used for the center strip is really red, and donates color to the maple when rasping. I think I’ll be able to eliminate most of the red from the maple, but even if some is left behind, I think it will be a positive tint which will add a bit of pink to the neck.

080615necklam.jpg

080614neckback.jpg

Next »