Archive for the 'Guitar 803 – OM Maple' Category

Guitar 0308 – Hey Larry, yes 3 or no 3

May 31, 2008

Long day in the workshop.  I put the sides back in the mold after I redesigned the mold and installed 3/8″ bolts in the end clamp areas for a sure fit.  The black dots for the fretboard arrived, and I laid them out to see how they looked.  I like both, but will defer to Larry which he wants.

First, with a fret dot on the 3rd fret.

080530yes3.jpg

Next without the 3rd fret dot.

080530no3.jpg

Of course, any fret dot config would be fine, just let me know.

Guitar 0308 – Kerf, radius, side brace, tail wedge

May 30, 2008

Installed the kerfing, radiussed down to the sides, created a rosewood/maple/rosewood tail wedge and rosewood/maple/rosewood side bracing.  Glued and trimmed and I’m ready to move to the top bracing.

080530endpiece.jpg

080530endandside.jpg

Guitar 0308 – Stain Color

May 28, 2008

Larry came by and we experimented with water based color for staining his maple guitar. He wants green. We used Stewart McDonald Colortone water based stains, bright green, amber, tobacco brown and mahogany red in varying concentrations and percentages. Finally, a 75% green with 25% tobacco brown at 65% dilution turned out to be just the color we were looking for.

It’s the one on the big hunk o’ maple farthest to the right, but left of the scrap sitting on top.

080527stain2.jpg

The colors aren’t true in these photos, but you can see the variations we came up with using different combinations of the 4 basic colors.  Oddly, the mahogany red tended more toward brown than the tobacco.  With the 65% dilution we were able to retain some of the whiteness of the wood, avoiding the loss of the maple quality.  It’s still going to be green though.

080528stain4.jpg

Guitar 0308 – Radius fretboard and install kerfing

May 27, 2008

I’m doing my famous two guitars at once routine, which is actually working out quite well.  This allows me to slowly proceed on one guitar, waiting for things on it to dry/cure/settle, then move on to the second guitar and advance through it’s dry/cure/settle phase.

The Maple OM top sides have been sanded in the 30′ radius dish and kerfing applied.  The neck and tail block have nicely settled in from the sanding, and the kerfing process is a no brainer for me now.  Once the glue dries, I will radius sand again to bring the kerfing down flush with the sides for the top.  Then I’ll turn it over and proceed with the planing of the back sides down to the rough shape before using the 15′ radius dish for final sanding before kerfing the back.

080527kerf.jpg

I thought it was going to be a chore to get the fretboard sanded down to the 16″ radius, but with my radius sanding block, it went fast, and it looks great.  I have ordered black plastic dots for the maple fretboard and will finish the fretboard surface with a spray lacquer (and I think before I install the frets).

080527fretboard.jpg

Guitar 0308 – Next step, bracing

May 21, 2008

Completed the back bracing and am now ready to glue in the top bracing.  Braces are rough cut and sanded smooth.  I’ll notch and radius the X-braces and relieve end tapers and X-brace scallops with the bandsaw before gluing in.

backbraced7.jpg

Guitar 0308 – Rosette repair and Fretboard binding

May 20, 2008

Decided to rout out a wee bit of the lacewood up to where it meets the BWB, or more accurately, where it didn’t meet the BWB. Used a 1/32″ downward spiral bit and went around twice, adjusting the diameter a skosh to open a channel to accept a two-ply maple binding strip. Aside from the fact that I almost cut through the top, and I broke off the spiral cut bit, I glued in the maple, trimmed it down, and the the end result is visually much nicer than the ragged gaps from the original lacewood BWB inlay.

rosettefixed.jpg

I cut down the unradiussed maple fretboard to the dimensions in the plans, planed the sides smooth, then relieved a small amount on each side on the band saw to allow for the attachment of rosewood binding. After planing the resawn fretboard and dry fitting the rosewood binding to the fretboard, the final dimensions were a wee bit under the plan dimensions of 43mm at the nut and 59mm at the soundhole end of the fretboard. I always seem to miss the mark on dimensioning either on the too small side (there’s no going back on this one) or way too proud (which requires massive sanding to bring down to size). Ideally, in the future, all my cuts will result a wee bit proud, requiring minimal sanding to arrive at the final dimension. I think this is like practicing a lick over and over again until you have it nailed.

fretboard.jpg

Guitar 0308 – Rosette

May 17, 2008

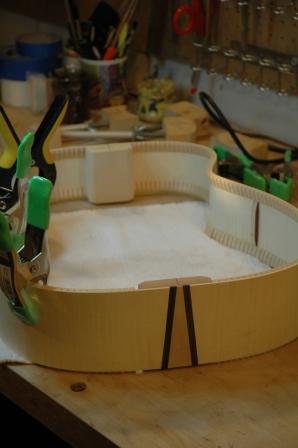
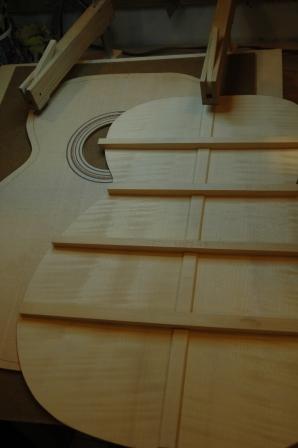
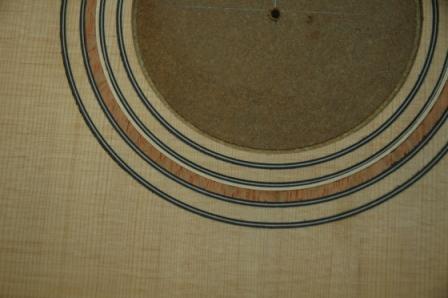
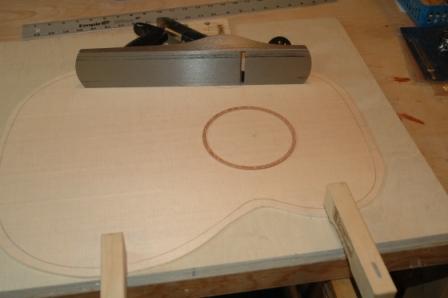
First opportunity to install my own rosette.  Larry and I decided on using a lacewood ring as the centerpiece of the rosette for his OM Maple.  Carefully reviewed all DVD and book instructions and discussion about coating top with shellac to reduce tearout also claimed using a good spiral cut bit would preclude having to shellac.

As I have a lot of sanding to do to get the shellac off the Rosewood OM spruce top, I decided to forego the shellac and rout the channels raw.  I channelled the center slot for the lacewood first, glued and inlaid it in anticipation of routing the outer and inned channels flush against the lacewood for the BWB.

rosetteprep.jpg

Clever, I thought, but I routed the inner channel slightly proud of the lacewood leaving a minute bit of spruce between the lacewood and the BWB.  I won’t know if this is visually yucky until I scrape down, sand, and finish.

rosetteprep3.jpg

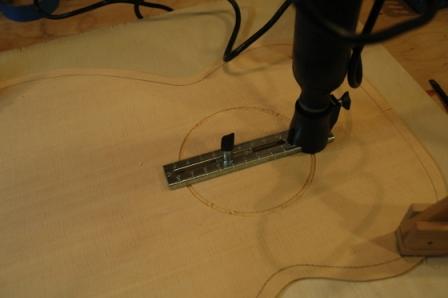
Was very careful not to rout too deep as that error can result in going through the top.  The converse though creates a lot of work scraping and sanding down the purfling flush with the top.

rosetteinlaid.jpg

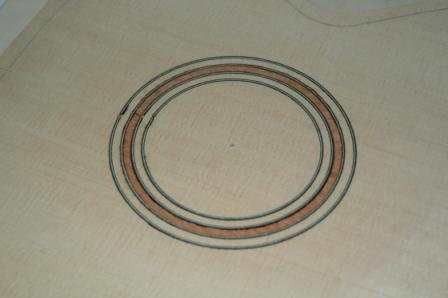
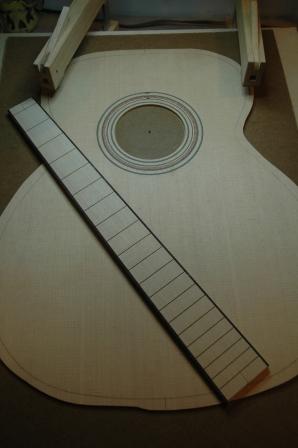
The end result looks good, but we’ll see.  Next, scrape, sand, then cut out soundhole.

Guitar 0308 – Headstock shape

May 15, 2008

I have engaged Larry in several design discussions.  One was on the end block trim, and we decided to craft a rosewood/maple/rosewood end trim to complement the rosewood binding.  Another opportunity is to come up with a groovy headstock shape.  I think this can add a bit of distinction to his guitar without getting too crazy.

My comments to Larry:  Tradition calls for the Martin style, like on my current OM, but you have a choice. When I insert the rosewood center trim, the width of the neck blank will be enough to allow us a large lattitude of shapes. Example would be your Taylor headstock shape, or a Gibson, or the ever goofy Hamer (goes to a point at the top and the tuners land exactly along the string line for all strings), or 6 on the right like Fender (we would have to buy different tuners). When we get together to pick colors, we can sketch headstocks. If for some reason you were interested in the Taylor shape, bring your guitar so we can make a trace.


Guitar 0308 – In the mold, end/neck block glued in

May 12, 2008

I was able to use my new Robo Sander to clean up the OM mold I built.  I noted there were some “not square” conditions on the mold sides which manifested into my first OM a bit out of square from bout to bout.  The Robo Sander is like a giant router flush bit.  Assembled the newly square mold and put in the maple sides and had a very hard time getting all surfaces flush against the mold.  I think it’s a result of the LMI bending not being quite tight enough around the waist section.  I had to craft an additional spreader to get the sides up against the mold all the way around.  This will be an issue when I glue on the top and back as it will probably put a lot of strain on the glue line for the top and back to keep the sides aligned.  If I continue to use LMI for side bending, I may want to invest in a bending iron to fine tune the bends so the sides sit in the mold almost perfectly, thus not requiring godzilla spreaders to force the shape.  I also think my lag bolts holding the mold sides together are ready to give.  I can hear them scream.  Next time I release the mold, I’ll ream out some channels to use a nut/bolt to secure the mold sides before the lag bolts give way.

larry-mold.jpg

Guitar 0308 – The parts have arrived

May 6, 2008

Three boxes on the stoop from LMI. Two contained the almost complete contents for Larry’s LMI Maple OM. The kit wizard is a great way to build your own inventory of components for the guitar to be built, but there’s so many places to go wrong, I think we missed a few things and ordered some superfluous stuff as well. What’s missing is a rosewood heel cap, rosewood binding for the fretboard, fretboard MOP dots in black, and whatever we decide is needed to augment the rosette (we only ordered a single lacewood ring). While upacking I was concerned that there wasn’t enough stuff. Alas, it’s all there. And the largest item was the maple neckblock, immensly heavy and enough raw material to make two necks and neck blocks to boot.

003parts.jpg

« Prev - Next »