Archive for the 'Guitar 802 – OM Rosewood' Category

Guitar 0208 – Frets are on

May 12, 2008

Sunday, good day to work on a guitar.  Finally finished setting the pearl dots (even though they may not be entirely centered) and filled one depressed dot with epoxy, sanded to a baby soft smooth surface.  Used the Kinkaid recommended method of installing frets by first wetting the fret slot, dribbling in some yellow glue and banging them in, ends first, then working toward center.  I must say they went in much cleaner than the last attempt.  Snipped them back after some time curing, and dribbled black superglue into the exposed slots on the side of the fretboard.  Ready now to file down smooth against the fretboard sides, then taper each fret in preparation for top filing and recrowning.  I may take a break from the recrowning and start in on finish sanding the body and neck in preparation for finish.  Ooooh, I’m almost there.

fretson2.jpg

Guitar 0208 – I’m officially a Luthier

May 9, 2008

Aside from the fact that I have joined the Guild of American Luthiers (http://www.luth.org/index.html) I have placed an order for my official guitar headstock logo. This makes it official, I am a Luthier.

smginlay.jpg

Guitar 0208 – The Fretboard is ON

May 4, 2008

Had a real good session yesterday, made grand progress. I set the neck, bolted on rather, and glued on the fretboard. Sanded and rasped the headstock, neck where it joins the fretboard, and it’s really looking nice. There is a slight bow to the fretboard starting where it meets the body and moves toward the rosette. This is due to a minor difference in the neck angle vs. the top of the body. I think this is acceptable, but will realize the problem’s significance only when I get the bridge on and the frets levelled.

Used my new drill press to drill the holes for the fretboard MOP dots. First thing I did was to drill the 5th fret dot slightly off center. How could I have done that? I measured, levelled, used masking tape with a whole bunch of guide lines, measured again, yet I still got it wrong. RATS. Maybe I’ll put a 1/4″ dot there which I will be able to center (Larger dot, centered will consume the smaller off center hole). Hmm, yeah, that’s what I’ll do.

Continue Reading »

Guitar 0208 – Neck Set

April 30, 2008

As mentioned earlier, I took too much off the top of the neck block which created a shallower upper body depth and left the neck proud when inserted into the neck block. I knew I was going to address this later when I discovered the error. I used a rasp to shave off 1/16″ on the rounded end of the tenon. The brought the neck down flush except for a mm proud on the right side which meant I needed the shave a bit off the tenon on the proud side and insert a shim on the opposite side to level the neck and still have a tight fit. I also had to open the holes up a bit to accomodate the fact that the nut holes dropped 1/16″. Also had to open up the hole for the truss rod as well. Dry fitted the neck and inserted the truss rod.

Next steps are to measure the distance between a straight edge set on the neck at the bridge location to assure the correct gap which indicates the neck angle is right. If not I’ll have to shave the portion of the neck that meets the upper body to create the correct angle.

Continue Reading »

Guitar 0208 – My logo design is ready

April 29, 2008

Got a pdf from Gurian Instruments with my logo design. I approved, and they will make a sample. If I approve the sample, they will produce 20 headstock veneers with my MOP inlay. 1/3 ebony, 1/3 rosewoood, 1/6 sycamore and 1/6 maple. I’ll also ask for a loose MOP which I can inlay myself into guitar 002’s headstock.

Guitar 0208 – April 27, 2008 – on to the neck

Over the past week I took a little diversion. I have a homemade workbench in my shop (really the furnace room, which may, temperature/humidity wise, be a bad choice for a workshop). The setup of the room is quite nice for the one person guitar maker. I have been acquiring hand and power tools over the past 3 months and have run out of space for storage and work surfaces.

There was unused wall space behind me, as I face the workbench. My orignal bench was built from plans I found on the interweb, and it is essentially two by fours with a solid core door mounted on top. It is sturdy and has proven to be an excellent work area. I modified the plans to be a shallower, L shaped workbench to nestle into the wall and around a corner. It took me a week to build, and most of the time was trips to the hardware store for supplies. Dunn Lumber always has a supply of odd stock at a good price which helped keep the cost down. I scrounged two by fours from our sukkot which we haven’t erected for years. The top, instead of a solid core door, is a laminate of two 3/4″ ACX plywood.

It is now the proud holder of my bench grinder, the massive slap of marble I scrounged two weeks ago, a new sanding station, my sharpening stone jig, and the go-bar platform. The final bonus is another pegboard reserved exclusively for guitar making tools (even though many remain on the old pegboard).

Continue Reading »

Guitar 0208 – Late April 2008

April 16, 2008

Spent considerable time planing, filing, chiseling, and sanding the top braces. I recovered sufficiently from my over sawing the braces. Still, there remain some hard angle edges in the brace scallops, and the X brace internal scallop, even though I started from scratch, came in nicely, to about a .4″ depth. This depth may not be enough, but I still have the opportunity to deepen them. I also gouged the top inside several times when chiseling for rounding in the areas where I could not get my finger plane. Not deep enough to cause damage, but cosmetically disturbing.

I installed the bridge plate, and next I will 220 sand all the braces and the the spruce top inside to make real pretty before gluing on the top. I also need to clean up after my epoxy (mixed with mahogany dust) of the back brace entries into the kerfing. I did the epoxy to clean up after the too large slots I put in for the bracing. I shouldn’t have to do this if I slot accurately next time. I also need to round file a slot in the brace between the large brace and the neck block to accommodate a truss rod wrench.

Continue Reading »

Guitar 0208 – Early April 2008

April 1, 2008

After radiusing the top, I left the guitar on the 30′ dish and started the block plane process of bringing down the back sides to the 15′ radius (roughly). I taped the approximate depth on each side so not to over plane. I was very nervous about the planing as I have never performed this step. I took my old trusty Stanley block plane and cleaned it up and used my new Japanese wet sharpening stone to put a fine edge. This did the trick and the planing went very well. Using the 15′ dish to check for daylight, I continued to plane until I got it just so. Radius sanded (and the superglue fix to the sides at the end block held firm) to prepare for kerfing.

Continue Reading »

Guitar 0208 – Let’s Get Started

Guitar Building Log – LMI OM Rosewood Guitar Building Kit

March 1st, 2008

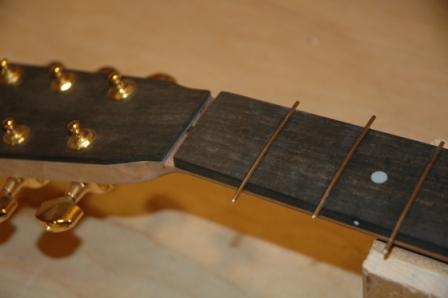
Received kit (#LMPO) – LMI descripton and parts list: LMI OM Serviced – This kit has everything to make a high quality orchestra model (OM) guitar matching LMI’s historical standards. The major parts included in this kit are: AAA grade Sitka spruce top, 1st grade Indian Rosewood back and sides, Ebony fingerboard, quartersawn Honduran Mahogany neck, and Gotoh gold tuners. The binding and purfling scheme is curly Maple binding with a fine B/W/B laminate for the top and back. The 3 ring rosette is inlaid and the majority of the services are completed.
$550.00 Save 205.61 (25.6%) from the retail cost.

Reviewed DVD instructions several times before embarking. First step is to build a guitar mold. Referenced many sources for building the mold, but mostly followed steps in O’Brien DVD from LMI. Used 3 ply AXC plywood. End result errors: not enough neckside and heelside material left in place to install a removeable bolt at each end, ended up using a lag bolt. Inside of mold a bit “serrated”, not smooth enough for my standards, but didn’t have any tools to smooth. Used a scraper, sand paper on block, but should have had a drum sander mounted on drill press to finish nicely. After the fact, I will clean up this mold and rig something to extend the end blocks and install bolts so I can use for future OM construction. I also manufactured the spreaders per O’Brien’s DVD. Not totally satisfied with the shape of the end blocks on the spreaders, but I can revisit those as well when I clean up the mold smoothness.

Went bonkers ordering tools again. This time, in response to the building process in the DVD, ordered a Go-Bar assembly with 18 fiberglass bars, two radius dishes (15′ and 30′), and sanding disks from Blues Creek Guitars. And a band saw, and a new fine grinding wheel, and sharpening stone, and Bench Plane. Carl gave me his old Drill Press, which I need to clean up and mount on a stand.

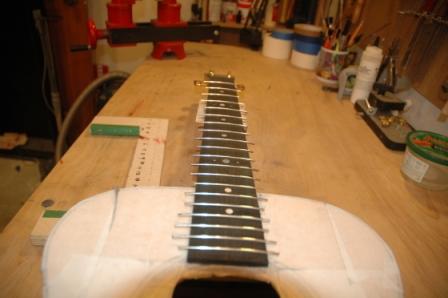
First step: Insert prebent Indian Rosewood sides into mold. Mark center line, saw and return to mold. Shape neck block, first removing small amount of stock from truss rod hole end to bring dimension length to plan length. Use bandsaw to 45 degree angle cut outside edges (may have done too much). Do same for end block, and attempt to put a 20″ radius on end that goes against (glued) sides. Using a hand block to sand, I almost got the correct angle, but with a little too much round on the ends, and a little too flat in the middle. This is where a sanding station would help. Continue Reading »

« Prev